

Native IOS
Introduction
Section titled “Introduction”The iOS integration of the IntelliProve plug-in involves incorporating the IntelliProve SDK files into your project dependencies.
All this is nicely laid out in our step-by-step guide below.
The integration guide covers three sections:
- Adding the SDK
- Setting up the project
- Usage
GitHub
Section titled “GitHub”Our GitHub repository provides a fully functional example of our platform’s integration, demonstrating the seamless setup and utilisation of our native SDKs for iOS platforms.
https://github.com/IntelliProve/intelliprove-web-plugin-ios
Adding the SDK
Section titled “Adding the SDK”We provide an SDK to facilitate the setup and configuration of the Webview component.
Last update 04/01/2026 13:40
- Unzip the
IntelliProveSDK.xcframework - Open your project in XCode
- Open
Project Settings > Generaland in theFrameworks, Libraries, and Embedded Contentsection, add theIntelliProveSDK.xcframeworkfrom above as a dependency

Setting up the project
Section titled “Setting up the project”We need to add some keys to the Info.plist. Otherwise, the iOS application will not request camera permissions and will not pass the App Store certification process:
- In
Project Settings > Build Settingstab, verify that theiOS Deployment Targetis set appropriately. The minimum supported version for the IntelliProveSDK is iOS 15.0 - Now open the
Project Settings > Infotab to add the followingInfo.plistvalue:NSCameraUsageDescription- Add a String here that will be displayed when the application asks the user for Camera Usage permissions
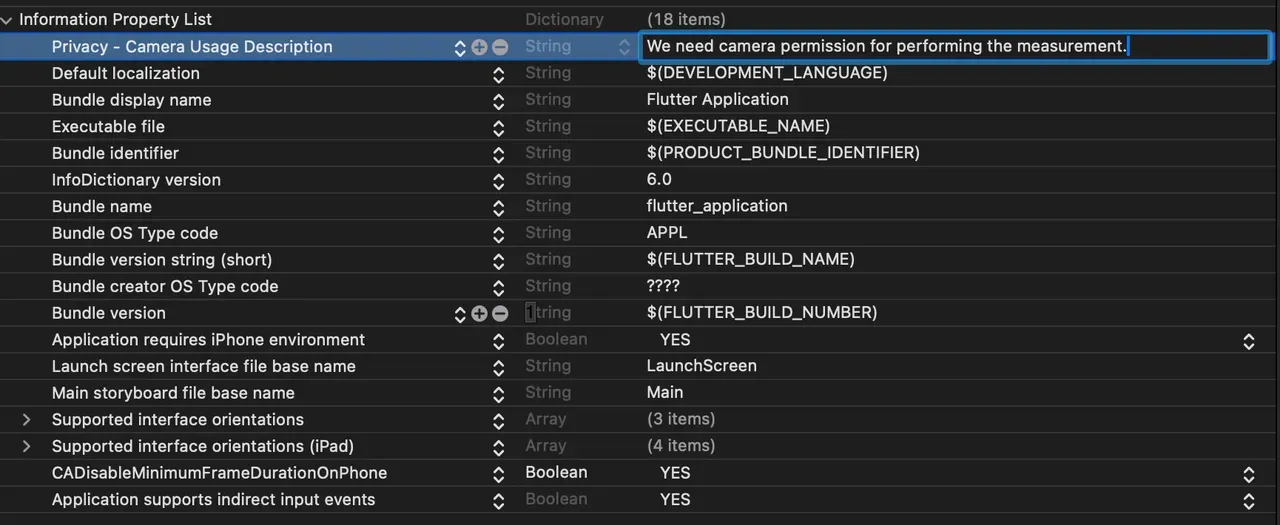
- Use the
IntelliWebViewFactoryclass to create a newIntelliWebViewControllerinstance - Pass the following arguments to the factory’s
newWebViewmethod:- The generated URL for the Face Scan plug-in. Request the URL using the Get Face Scan URL API endpoint.
- Your implementation of the
IntelliWebViewDelegateprotocol
import SwiftUIimport IntelliProveSDK
class SceneDelegate: UIResponder, UIWindowSceneDelegate {    private let url = "https://plugin.intelliprove.com/?action_token=xxx"
    var window: UIWindow?
    private lazy var navigationController = UINavigationController(        rootViewController: UIHostingController(rootView: RootView(onButtonTap: { [weak self] in            self?.showWebView()        }))    )
    func scene(_ scene: UIScene, willConnectTo session: UISceneSession, options connectionOptions: UIScene.ConnectionOptions) {        ...        window.rootViewController = navigationController        ...    }
    private func showWebView() {        let webViewController = IntelliWebViewFactory.newWebView(urlString: url, delegate: self)        webViewController.modalPresentationStyle = .fullScreen        navigationController.present(webViewController, animated: true)    }}
extension SceneDelegate: IntelliWebViewDelegate {    func didReceive(postMessage: String) {        // postMessage is received as JSON string, so needs to be parsed        print("POC: \(postMessage)")    }}
struct RootView: View {    let onButtonTap: () -> Void
    var body: some View {        VStack {            Text("WebView POC")
            Button {                onButtonTap()            } label: {                Text("Open WebView")            }        }    }}
Swift UI
Section titled “Swift UI”- Use the
IntelliWebViewLinkView component in your existing Swift UI page. This component works similar to the Swift UI NavigationLink component. - Pass the following arguments to the component’s initializer.
- The generated URL for the Face Scan plug-in. Request the URL using the Get Face Scan URL API endpoint.
- Your implementation of the
IntelliWebViewDelegateprotocol
- Control the visual appearance of the link by providing view content in the link’s
labelclosure
import SwiftUIimport WebKitimport AVKitimport IntelliProveSDK
class ContentViewModel: ObservableObject {    let urlString = "https://plugin.intelliprove.com/?action_token=xxx"}
extension ContentViewModel: IntelliWebViewDelegate {    func didReceive(postMessage: String) {        print("POC: \(postMessage)")    }}
struct ContentView: View {    @ObservedObject    private(set) var viewModel: ContentViewModel
    var body: some View {        VStack {            Text("IntelliProve SwiftUI POC")                .font(.largeTitle)
            IntelliWebViewLink(                urlString: viewModel.urlString,                delegate: viewModel            ) {                // Visual appearance of the link                Text("Show WebView")            }        }    }}
#Preview {    ContentView(viewModel: ContentViewModel())}
Next steps
Section titled “Next steps”- To match the plug-in with your brand’s colours and fonts, please visit our UI Customization documentation.